So you can compose melodies and you know how to master, but if the voice you add isn’t perfect, it can spoil everything else!
The listener’s attention usually remains focused on the vocals throughout your track. This is the element on which you cannot fail. And until you’ve mastered it well, you’ll never have a professional look. Recording and mixing vocals doesn’t have to be difficult… It just takes rigor and methodology!
To produce good vocals, there is a recording phase and a mixing phase.
While the recording phase is the artistic part, mixing is part of the technique.
In this article, we’ll keep it concise, not waste your time, and make sure you have all the essential information you need to record and mix your voice.
1) Have a good singer and choose the right voice for your song
It may seem obvious, but having an artist who has a tone of voice adapted to your style of music and who sings just right is the basis for having a professional look, especially since it will make it much easier for you during the mixing phase. Also remember to pay attention to their accent: some jury members of the listening committee of our Talent Pool were not interested in some music because the singer’s accent wasn’t right. Depending on your goals and targets, the singer’s accent should be taken into account.
2) Have the right recording equipment for the voices
A lot of people think you just buy a microphone, plug it in, and then that’s it. If only recording in the studio were so easy…
At a minimum, you need:
- A good quality dynamic or condenser microphone
- A preamplifier possibly equipped with a phantom power supply
- A recording interface with quality analog-to-digital converters
- A Digital Audio Workstation (DAW) to record the voices.
The prices for this equipment are nowadays very reasonable, and there are “packs” with very good quality/price ratios to start with.

So, now you have what you need to record. Now you need to control what is is that you record.
3) Isolate the vocals
Having access to the right equipment will bring you a lot of quality in your recording, but that’s not all. You will at least need some soundproofing or a tool similar to the one shown below:

The idea is to turn an entire room into a voice booth or create a portable system to isolate the raw source (your voice) from the reflections bouncing off the walls. This is absolutely essential to create a clear recording of your voice. Otherwise, you will get a result that will sound tarnished and confusing due to the delays and other acoustic abnormalities that occur in an enclosed room, and that exhibit strange spikes and dips in frequency range.
I would also suggest that you isolate your voice from your breath. What I mean is that when you exhale while singing or rapping, you breathe a lot of air that the microphone can record. In particular, you want to avoid picking up plosives (b’s and p’s).
One of the solutions to avoid plosive problems is to record off-axis, which means that you should direct your voice just to the left or right of the microphone rather than directly at it. The second defense against this problem is a pop filter. These pop filters do exactly what they say: they filter the sounds in your breath when you sing by dissipating and diffusing the impact of the powerful breath of air.

Finally, make sure that the microphone does not pick up music from your headset during recording. It is very important to get closed headphones for recording studios.

The solution lies in the fact that the soft cushions isolate the sound so that it only reaches your ear and not the microphone. In addition, the ear cups are closed and of solid construction. Open headsets are also used in the studio for mixing, but they are really unsuitable for recording, because the microphone captures a lot of music in addition to the artist’s voice.
You now have the keys in hand to record your isolated voice with the best possible quality, but you still have to know how.
4) Gain Staging—the ratio of the output of your recorded voice to the signal input
This is where many people fail. It’s easy to start twisting the preamp and interface buttons until it sounds good in the computer. It’s just as easy to ruin your gain staging. The question is: “What is gain staging and how to do it correctly?”
Gain is the ratio of the output of a signal, in this case your recorded voice, to the input of the signal. It’s a bit like a volume knob, except there’s a maximum and minimum threshold before your quality takes a nosedive, and that threshold exists at every stage of recording, from your mic, to the preamp to the converters. You need to succeed every step of the way to get a professional quality registration.
The basic concept is to make full use of every “bit” available in your computer without pushing it too far. It’s like the pixels on your TV or computer screen.
Some tips for recording your voice with proper gain:
Recording with too low a voice volume means that you will have to increase the volume of your track after recording, which can lead to a drop in voice pickup quality. It’s like saving a very small image and then displaying it on a one-meter wide TV: it will look extremely blurry and pixelated. But if you save a large image (like your voice at the correct volume), you won’t need to stretch it (increase the volume of your voice track) later.
Setting up the gain is very straightforward. In your recording software, whether it’s Garage Band or Pro Tools, you need to monitor the level of the signal you’re sending:
- First, set the main gain on the interface to 0 dB. You must not increase or decrease the gain from there.
- If you are singing at a comfortable volume and the signal is too strong (hitting in the red and creating peaks in your software) or not strong enough, only adjust the gain on the preamp channel (sound card) you are using.
- Adjust the gain until your average volume is around -18dB. You will pass above and below, but most of the time you will arrive at -18dB. If your average volume is 0 dB, it means that you are pushing your 18dB sound card too high. Recording digitally at -18dB is equivalent to recording an analog at 0dB.
Now you’re recording with the best possible voice quality. Now it’s not about how you record, it’s about what you record. Let me explain …
5) Always record a dry signal when doing vocal takes
Compression is the only effect that affects your signal before the signal reaches your computer. If you don’t need to compress before, then don’t do it. However, some singers are undisciplined, getting closer to the microphone or playing an extremely dynamic role naturally. You may need compression to keep them from clipping, or at worst a limiter. Something as light as a 2:1 ratio should help tremendously though.
Always record your voice completely dry and add effects during the mixing phase.
The reason you want to record an unprocessed signal, without any time-based effects like reverb and delay, is because it will allow you to keep your options wide open when you start mixing.
If you record with an effect on the track, you greatly reduce your mixing options. Indeed, if you apply compression, for example, you also compress the reverb and the delay, if you record your voice with a reverb, you can’t choose a different reverb, etc…
6) Use talkback and headset effects
The goal of the singer is to give the best possible performance. Your goal as a studio engineer is to ensure that the singer has what they need to give the best performance.
I told you to record an unprocessed signal, but that doesn’t mean you have to listen to an unprocessed signal during recording.
The most comfortable place to sing is in the shower. People let themselves go and feel good. The reason for that lies in the reverberation. In a tiled shower, a small room with tile, or a hard surface and a large mirror, etc, everything is hard, and the flat surfaces make your voice resonate every which way. You end up with a big, lush reverb that hides the precise details of your voice.
You may not sound great to your neighbor, but you don’t hear the little details that make you self-concious and feel like you’re giving a concert-worthy performance. Help your singer feel this, and apply a reverb to their voice in their headphones. It really will make the difference.
The second thing you can set up is a talkback system. Most DAW’s make this pretty easy to do. All you need is a good, cheap microphone to install on your desk to talk to the singer. It will be muted until you hold down a keyboard shortcut, then you can talk directly to the singer without him having to enter the mixing room or remove their headphones. It’s kind of like a baby monitor. There are also hardware talkback systems, but for now, it’s not necessary at all.
This conversation system is very useful because it keeps the singer’s environment stable and helps them to stay focused, without wasting time between each take.
Whether you use a hardware or software solution to respond to the singer, you’ll need a desktop microphone stand. A solid and small foot, heavy enough not to tip over, is a must. You will not move the mic, so that it is not a major concern.
7) Record more voice takes than you need
During the recording process, you won’t have time to analyze each take. The best approach to dealing with this situation is to save all the previous vocal takes: when the singer’s performance is at its peak, record the successful version, then record a few more passages once the pressure has gone down, as the singer feels that they already have a pretty good performance in the bag.
If your first version is bad or is destroyed, you have a second backup option, and it only cost you time. In the end, if you need it afterwards, it saves you time.
8) Record harmonies and accents
Even if you’re not sure you’re using them, record harmonies and accent phrases. This will create options for the mixing process. The performer may tell you that they want a real, intimate performance, without duplicates or harmony lines. Tell them “okay, but let’s be careful and record them anyway.” You never know when the song may be rearranged and ramped up in the end, and that’s where your unplanned takes will come in handy. So, if the unexpected happens later, don’t worry, these unexpected shots will allow you to create remixes, TV spots, radio spots, etc…
9) Create the perfect composite take
We’re talking about the main vocal track, but you should also do this for harmonies and accents if you plan to use them. Otherwise, save them for later just in case. That’s why all these takes were saved…
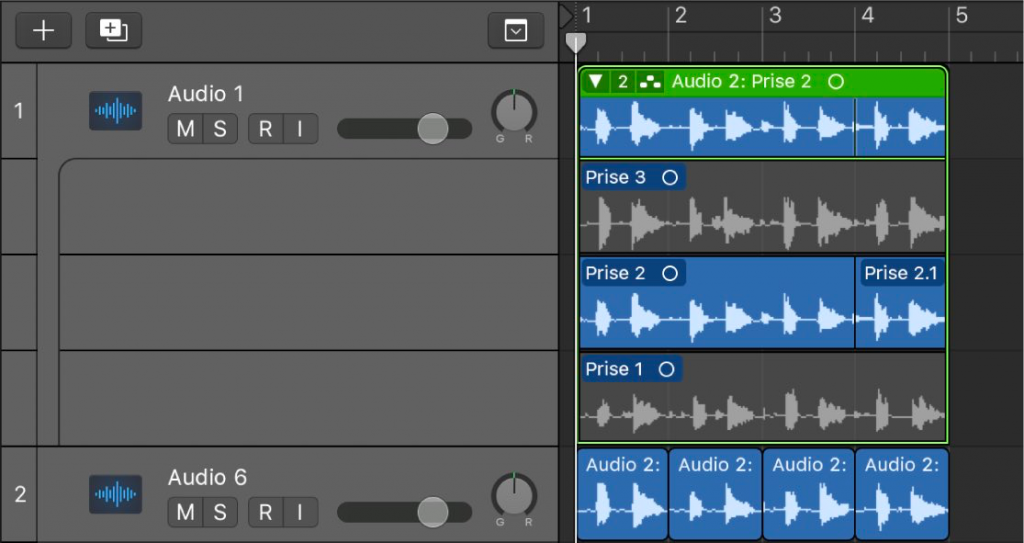
The above example comes directly from the Logic Pro documentation. All those extra versions of the main take you saved now allow you to choose specific phrases in each of them to create the perfect performance. Your best take is 80% awesome, but you know the artist could have sung better. Luckily, they did on other takes, which you saved.
Creating a composite take is like being at the grocery store and trying to buy a dozen eggs. You open the box and find that one of them is broken. So you replace it with an egg from an intact carton, creating a perfect carton of a dozen eggs.
Most DAW’s have the ability to stack tracks underneath each other and then transform that track to create a perfect track. The majority will even make a chained fade for you so everything looks smooth.
In the image above, you choose parts from each take and Logic Pro chooses a color code for each take, allowing you to see the origin of each element of the composite take. You can then create a “perfect version” if you wish, or simply leave it as a composite take, if your computer can handle it once you have started adding effects.
And that’s why you never hear a live performance as successful as recording in the studio. Because the studio version is in all respects larger than life.
10) Automation and noise gate
You did it! You are now ready to mix after recording the most perfect voice take you will ever get. But it still doesn’t sound like your favorite album. Don’t panic, that’s the whole point of mixing. It’s time to polish and cut this diamond.
The first thing you will do before adding temporal spatial effects is to clean up the dynamic aspect of your recordings. Dynamics refers to amplitude, which refers to volume. You need to balance the levels of these outlets.
You will notice that even though the performance is masterfully finished, some parts are quieter or louder than others. This is where volume automation becomes convenient.
Your goal here is to try to average the volume across the entire outlet. The reason is that you want to send consistency to your effects buses. “But isn’t that what compression is supposed to do?” If you do not do this before sending the track to the compressor, you will completely crush some sections and barely touch the others. Don’t be lazy!
At this point, you can also decrease the volume of breaths, create silence at the beginning and at the end of the take, etc. You can really cut it up with a very thin scalpel, if you wish. Or you can just trigger a noise gate and save a lot of time. You may have to go back even after the noise gate for particular problems or noises, but in general, this will fix the problems for you.
A noise gate is a type of compressor. It works on this logic:
“If the signal volume is less than X decibels, decrease it by X decibels (or turn it off completely).”
You will have to find the right threshold so as not to cut the ends of your singer’s voice and set the output to the right value. You will need to choose a fast attack, so that the noise gate activates at the indicated threshold instantly.
11) Design the soundscape with panning when mixing audio
Now that you have the perfect shot with noise reduction and everything else is replicated at consistent levels, you can move forward and set the stage for your soundscape.
We are no longer in the world of monophonic recording (although some radio stations are). Not only are we dealing with stereo recording and playback, but surround sound is becoming more and more common. Even in stereo, you have a large area, even an abstract one, to fill with sound. This width is great for a listener, so get ready to start using panning.
Always leave your main voice pickup directly in the middle, without panning.
Of course, you’ll hear some Beatles and Beach Boys music in which the mixers were freaking out, but that’s because the conventions hadn’t been set yet and the stereo was still new. Just like your bass and kick drum, always leave your main voice in the center. There are a hundred reasons for this: off-axis listening, overuse of a speaker, etc. This is pretty much a rule for any professional recording and mixing.
Generally, the accompanying instruments can be placed very wide, very left and right. Explore the width between 45 and 60 degrees (this is the maximum) and see what suits you. You’ll want to have accompaniment instruments that are a little quieter than lead vocals. Never let anything stop the listener from hearing your main voice clearly.
For harmonies, you will usually want to keep them quite close to the main vocals or you may lose the harmonic aspect. Sometimes it’s good to leave a little distance between them (quite a bit), so feel free to experiment. For rap accent phrases and ad-libs, stay close to the lead voice as well. The extreme panning throughout the song may sound cool, but you lose the ability to emphasize the chorus this way if you do it all the time. You’re not locked into one scenario for the entire song. Switch it between verse and chorus to give your listener a treat.
The last point to mention is that you shouldn’t get confused with this and let your voice devour the whole stereo field. Save space for the instrumentation. Plan ahead and have some sort of image in mind for the final product.
12) The equalization phase (EQ) during mixing
This is where you create clarity. The problem is that it’s the voice of the same person, even if they’re different notes depending on the octaves and regardless of how far you move them. You will have a frequency collision and you need to solve this problem by cutting “pockets” in the frequency spectrum so that every element of voice performance dominates.
Make no mistake, all frequencies of all instruments will overlap. Look at the image below for an example of how instruments dominate but share frequency ranges.

The rule of equalizing your main vocals is that you should never compromise them for anything else. The most important sound aspect of each vocal song is the main vocals. Don’t ask yourself every time. This is what the human ear locks onto and wants to hear.
This doesn’t mean you won’t make any corrections to your primary take, because you will for sure. For example, you will not make a big cut to hear the guitar better, but you will cut the guitar to hear the main voice better.
Remember, you should never mix your vocals in solo mode (in other words, by setting all other tracks to “mute”).
Everything I say in this section relates to the rest of your mix, and no mix is the same. There are no strict rules. Please adjust the values to your own piece and to your own tastes.
The low-frequency roll-off:
The only thing you can be sure of for most mixes, unless it’s a vocal duet, piano, or guitar voice, is that you’re going to be using bass frequencies. Your voices may not be very visible in the bass and sub-bass regions of the frequency spectrum, but there is volume in all your vocal takes and instrument tracks. And all of this creates a whole that sounds messy.
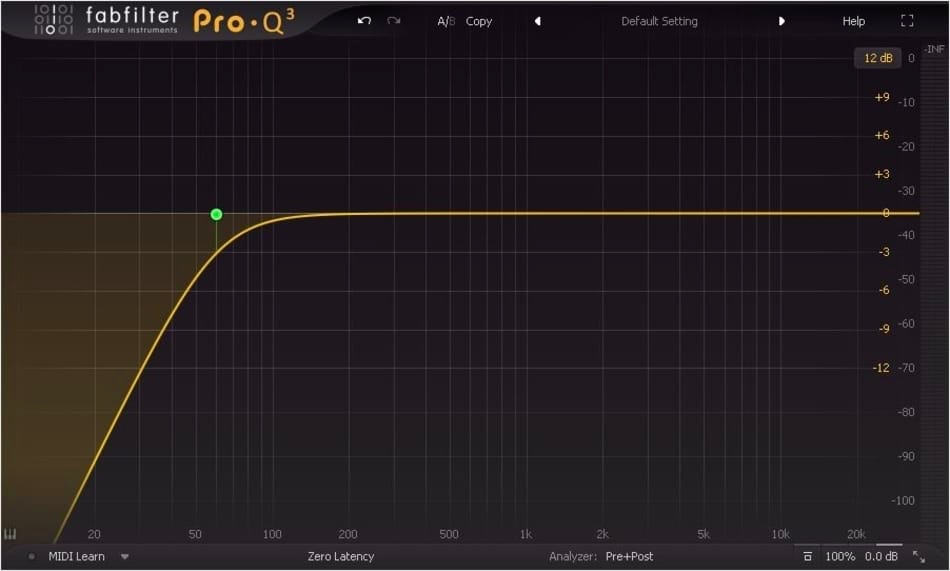
You can use a high-pass (or low-cut) filter if you want a strict cut, or use your parametric equalizer to create a step-down. If I were you, I’d get used to hearing subtle changes with the parametric equalizer. A strict threshold is often noticeable and too severe.
A parametric equalizer displays the entire spectrum of audible frequencies for humans, the lowest on the left. See how the “composite” white line (the combination of all your equalizing settings) winds smoothly around the left side of the bass? It’s a roll-off. You will find that you will want to lower a little more aggressively by starting around about 125 Hz to eventually reach silence at 40-60 Hz. Play with these values, but it’s a good place to start. Depending on your bass and bass drum, you can push it all higher.
Once you have done this for all your voices and other instruments, you will find that things are immediately much clearer in your mix, especially for the kick and bass.
Identify harmful frequencies:
The right way to find problematic frequencies that arise in your voice pickup is to take a node in your parametric equalizer and create a thin, but radical peak of 10 to 15 dB and sweep it from right to left in the spectrum. You will hear oddities in your complete mix, and you can what your vocals are contributing to this problem in this method.
Once you have found them, you will want to remove them, but never cut them as extremely as you boosted them, that was just to spot them. The actual method for reducing these frequencies should consist of small cuts of 3 to 6 decibels with a slightly wider Q curve. The rule is to stimulate wide and cut little, or things will start to seem strange and inhuman.
Here is a general guideline you can follow to find these problem areas:
- 100 Hz – 300 Hz: Too little: body loss, too much: removes clarity
- 200 Hz – 500 Hz: feels good, too much sounds muffled
- 250 Hz – 750 Hz: Too many scrambled sounds
- 600 Hz – 1.1 kHz: too many sounds can sound harsh & nasal
- 1 kHz – 3 kHz: intelligibility hides here
- 3 kHz – 6 kHz: presence
- 5 kHz – 8 kHz: whistling
- 9 kHz – 15 kHz: scintillating / crystalline
- 10 kHz – 20 kHz: air / breathing
Remember this will change depending on the vocal range and octaves the singer is working in. Especially with genre. That’s why you need to go to such lengths to search for bad frequencies.
A good tip to keep the main voice in front of the mix is to give it a little boost in the right area of presence and in the area of intelligibility. Then, more finely reduce the competing instruments or backup voices in the same frequency ranges according to the panning.
We could talk about this all day, but there’s no substitute for the time you spend listening and playing with those frequencies. Just get started with your best studio equalizers and do what sounds right.
Always start with solo voice to create a voice that sounds good. Then, access the full mix and create a space in the frequency spectrum for that “right” voice.
All secondary voice takes:
In general, when we talk about complete doubles, harmonies, accent phrases, etc., you can treat them more severely. Cut them thinly where you increase the main voice. Keep them far, they are there to support the thread, not to shine.
Lower the low frequencies more aggressively and as well as the high frequencies on the secondary voices. You can also remove the high-end frequency so as not to overload your mix. The trick is to reduce the overall presence of these tracks compared to lead vocals in the mix while prioritizing them over the rest of the instrumentation.
One way to help you in this endeavor is to aggressively compress them. Speaking of compression …
13) Compression when mixing your tracks
You’re really close to professional-quality voices, but there’s something missing. Indeed, the industry and listeners currently prefer very little vocal dynamics (or music dynamics in general). What you’re missing is compression.
We have waited until now because when you increase and decrease with the equalizer, you slightly change the volume of your recording. Your goal is to control the dynamics so that you make all your volume changes before compression. You will restore the consistency we talked about before feeding the signal with spatial effects.
This process will involve two or three steps, which will totally depend on the genre of music you are working with, the singer’s voice and the choice of parallel compression.
General compression:
First of all, you will always want to achieve the right level of compression. There is no other way for me to guide you through this exercise than to tell you to find mixes you like in the genre you are mixing to get an idea of how much you need to crush the voice. This is what compression does.
The compression sets a threshold, and then any part of the voice above that threshold is overwritten by the ratio you choose. The speed at which this overwrite begins is called the attack, and you can tell it to immediately stop the overwrite or continue for a while using the release.
These are your four settings. Some compressors allow you to change the knee, but much depends on the compression algorithm used. Some plugins even have different algorithms to choose from, emulating older hardware compressors. They all do the work.
For beginners, it’s hard to go wrong with the fastest possible attack and release. This requires you to simply adjust the threshold and ratio. At this point, you need to experiment. In today’s world, don’t be afraid to push your ratio up to 5:1 or even 10:1 for genres like rap, rock, and pop. Taking a 5:1 ratio as an example, the quick explanation is that for every 5 dB above the chosen threshold, only 1 dB is obtained. It reduces the volume of this ratio. So, if 10dB exceeds the threshold, only 2dB will come out.
You lower the loud parts so that they are closer to the quieter parts. This greatly increases your ability to understand what is being said and make it heard clearly. You can see why it’s important to do equalization first, so that bad frequencies don’t get louder and louder.
De-esser:
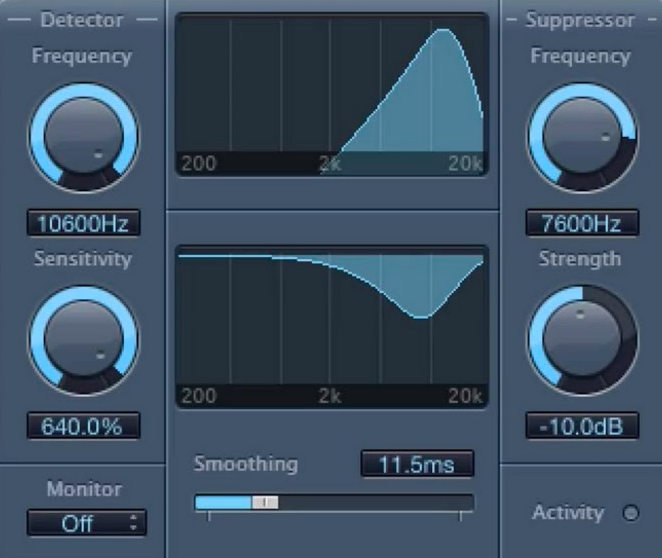
It’s half equalization and half compression. A de-esser plugin is actually a parametric equalizer chained to a compressor.
The unpleasant whistling sound occurs when the microphone picks up air pulses in the high frequencies when certain syllables are spoken. You know how sometimes, every time an “S” sound comes out, it gets extremely loud? That’s what a De”S”er gets rid of.
What a De-Esser will help you do is sweep a powerful boost around the whistling range until you find more of the problematic frequencies. Then, and only if these frequencies exceed a threshold you have defined, their volume will be reduced by the amount you have chosen. This only affects the piercing S’s instead of removing them with an EQ over the entire take.
You won’t always have to do this. Many times, with the right singer, the right mic, the right recording distance, and the right recording angle, you’ll never run into this problem. But if you do, a de-esser is your friend.
Parallel compression:
Parallel compression is an advanced technique that allows you to do two things: maintain momentum while controlling it, and send a more dynamic version of the voice to the effects bus.
You won’t use this technique in many genres today. But there are genres such as classical, folk, acoustic and anything more refined, where dynamics always play an important role in the performance. The task is not easy… you want the performance to be understood and stable while allowing the singer and other instruments to express themselves through dynamic manipulations, such as scratching harder, hitting the keys harder, etc…
The solution is parallel compression. Basically, you send two versions of your recording to two separate compressors and you compress only one and keep the other one pretty brutally dynamic. Then you recombine the two, which serves to increase the volume of the quiet parts while allowing the stronger parts to exist in fluctuation. You can still compress some takes, but don’t overwrite them completely like a pop recording.
The second reason is that you can completely overwrite the main take that will appear in the mix while sending a more natural version to the effects bus. This means that your reverbs will react according to natural performance without affecting intelligibility. Here, you skillfully involve the dynamics in the effects without them existing in the main take. It’s a pretty clever trick for some genres.
14) Temporal effects: reverberation, delay and echo
There is not much to say to describe these different effects. If you do not know the difference between a reverb, a delay and an echo, open a plugin for each and discover, you will quickly understand.
I can’t suggest how to apply them. Everything is based on your artistic choices and your mix. But what I can do is give you two tips for using them. The first tip is to place these effects on separate buses from each other and your main outlets. There is no reason to apply them to the mixing channels of your main outlets. Not only is it harder to control their volume this way, but you’ll freeze your software when your processor tries to calculate a million effects.
The right way to do this is to create a bus, which is an additional mixing channel that exists only to group the main channels and manage the effects. Once you have a bus, you can create a send from your main channels.
What happens is that your normal mixing channel that you have corrected and equalized is always directed to the main output. You don’t change it at all. But what you do is create a duplicate of post-effects and send it to another auxiliary channel called the bus.
There is a reason for this that is not limited to not taxing your processor too much. Let’s say you find the perfect reverb you want to apply to every instrument in your song. This is not how it works in reality. If you have 10 reverbs at a time, you’re going to have a mess. If you are recording a group of 5 musicians in a church and want to capture the reverberation of the room, you need to set up an ambient microphone and do it in a single microphone. There is only one reverb in real life. The reverb is a product of the acoustic space, not the instrument.
So you have to create a main reverb bus and send all the instruments there. With a send, you can adjust the volume of “how much” of the original track you are recording on the bus, and then adjust the main volume of the send itself using the fader. What’s even better is that you can then level the bus itself.
My recommendation on a reverb bus is to set up an equalizer on it and do a big roll-off on the bass and highs in the frequency range, then make the same cuts as you would to make room for the main voices. Apply a cut at 700 Hz for the bottom, and 5 kHz for the high frequencies. You won’t believe the difference. You’ll always have crystal clarity in your mix with a lush reverb. It doesn’t have to be a compromise.
You can configure as many buses as you want for delays, echoes, flangers and anything else you choose to use.
15) Pitch Correction
Finally, an additional tip that can be applied at any time after recording is to apply pitch correction to your voices. You can turn on autotune and adjust its settings, but I don’t recommend it for all musical genres. You’d be much better off using software like Melodyne that allows you to intervene on every note and apply a correction only when needed.
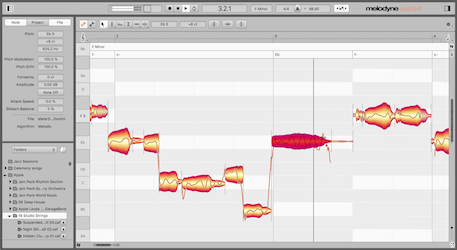
Of course, with autotune, you can automate when and where it fires, but with Melodyne, you edit takes destructively (which is fine in this case because you save the originals anyway). You don’t depend on the autotune algorithm for correct rendering. Plug-ins do not always create the same end product with every rendering and changing the tone of your main voice is not a step where you want to take risks.
Once your tracks are finished, to promote your music we recommend going through Groover, a platform that allows you to contact the top labels, media, radio and music industry pros with a 7-day response guarantee.